blchrd2024-02-03T17:27:44.439Zhttps://blchrd.eu/blchrdHexoWhy Build Privacy-First Application Is That Hard?https://blchrd.eu/2024/02/03/why-build-privacy-first-application-is-that-hard/2024-02-03T10:26:27.000Z2024-02-03T17:27:44.439ZPrivacy by design
I’m still working on PlaylistShare, hoping to release it to the world in 2024. I mean, hoping to release it to the few friends interested.
One focus I have beside making the application usable, is to put user privacy first. So during the development, I try to not use cookies or other tracking technologies.
For those who don’t know, PlaylistShare is a simple music tracking application. You can add an album with an url to listen to it, and when you listened, mark it as well, add a comment for yourself (or for the others), rate the album, etc.
I just want to share some of my thoughts on the subject, and some of the choices I made. I do not detain the truth here, it is just some “organized” thoughts someone can find interesting. If you want to talk about this, please feel free to contact me on LinkedIn.
Analytics
Well, this section will be short: I don’t really care about analytics (I can here SEO specialists yell at me from there). I used Piwik (now Matomo) a lot in the past, never used Google Analytics, and I won’t for my personal projects.
Here, analytics is not really a thing cause like I said one sentence earlier: I don’t care about analytics. Next.
The Captcha
When I made the user registration, I wanted to secure the registration with some anti-bot features. The go-to in that case would be reCaptcha or hCaptcha, but in a privacy-first application, reCaptcha is a clear no. hCaptcha, while it’s better in this field, is also a no, since it uses cookies and gather a lot of informations to work.
I also checked Altcha, and at first, I wanted to implement this one. You can install it in your own server, so no third party involved.
But in the end, I implemented an easier alternative (at least I think it is): IconCaptcha. It is a fully self-hosted captcha system as Altcha. It was a bit tricky to implement in my current stack (Laravel / ReactJS), but in the end, it works. I guess it’s less secure than Altcha, but in the current state of the application, it is enough and it’ll block the main threats I expect at first, without any privacy trade off.
Embedded iFrame
Then I write the Privacy Policy template for the application, I write a “No cookies or tracking technologies” section. I admit it feels good to write this section. But then I think further: I use embedded iframe from YouTube and Bandcamp. That’s a huge issue, it is a liability.
Embedded iFrame from another website is a risk and will eventually use tracking technologies one way or another.
I didn’t dig a lot through that. I read some articles, blog post and StackOverflow questions about it like this one or this one.
For YouTube embed, I currently consider Invidious API, I started to look at it, and it appears there is no tracking.
For Bandcamp, I start to check where the streamed audio files are from, to ditch the embedded iframe, not sure it’ll work forever though.
Why is it this hard?
So okay, I want to build privacy-first application, and it’s hard. But the question in the end is: why is it so hard?
TL;DR: Solutions that tracks users are simple, easy to implement, secure and working. Others are the opposite. More complex, and when you want to interact with other website, it is quite a journey.
Alternatives to reCaptcha or hCaptcha exists, but none is really easier to implement. And, hot-take here, I guess none is really as secure. But from a privacy point of view, reCaptcha is the worst, and any solutions that are hosted in a third-party server are a liability.
I spent 4 hours to implement IconCaptcha, and I’m sure reCaptcha would be a 10 minutes long implementation. For me, the user privacy is a strong requirement for this project. It’s a side project, so spend a lot of time on implementing a captcha isn’t really an issue, I can do it. For a company, 4 hours vs 10 minutes is an obvious choice.
For the embedded iframe, it is easy to just paste the embed code, or even reverse engineering one to build it dynamically (that’s what I do for bandcamp embed). But if we put privacy first, embedded iframes is code you don’t control. It’s a weak point. You have to trust the provider of the embed. And quite honestly, I didn’t trust YouTube to take care of the user’s privacy, and I trust Bandcamp less and less with the recent events.
And here, there is little to no alternatives. For YouTube, there is Invidious, and maybe others (no name comes to my mind right now), so it should be ok. For Bandcamp, there is none, or at least I didn’t find one. I guess I have to make my own from scratch. But there is a catch: I will spend time and energy at building my own embed by scrapping data. Is it worth it? For me, yes, I will learn new stuff and perhaps build a cool thing someone could use. For a company? Huge no, spending time to build something that can break at anytimes? Please.
My humble guess is this is hard because tracking is the most profitable thing on the web right now. The GAFAM (or AAAMM now I guess) make billions out of our personal data, covered by the fact their platform is free (as in free beer). They have billions to invest in infrastructure and workforce to build easily implementable and secure captcha, analytics and cool embedded content. And the new proprietary platform will eventually do the same to get a piece of the cake.
The FOSS community try to compete here, they build Invidious, FreeTube, PeerTube, Funkwhale, Mastodon, the list getting longer and longer and it is really cool. But the content is not really here for now. Creators are present on some of these platform, but in the end, it is a niche. And most of the musical content I consume is on YouTube or Bandcamp, unfortunatly.
And in the end, the web development environment wants you to track your users, for analytics sure, but just to gather data about you, not necesseraly for shady business. Sometimes it is genuinely to “improve the service”. For me, the real issue was, is and will be trust. You have to trust the company, developper and provider that bring softwares and services to you.
Really short conclusion
So here I am, trying to build my humble application without any user tracking.
It’s hard, but fun. And in the end, just the “No cookie and tracking technologie” section of the Privacy Policy worth the time and energy for me.
And in the end, you just have to trust me on that.
I can argue my source code is public, but how can you be sure the public source is the one thats run in production? You see the point, I’m not willing to elaborate this here. Maybe on another post.
I don’t tell you to don’t trust anyone, just be careful on what you gave to the Internet, you never know how that’ll be used.
Take care everyone.
]]><h2 id="Privacy-by-design"><a href="#Privacy-by-design" class="headerlink" title="Privacy by design"></a>Privacy by design</h2><p>I’m still Rewrite Your Projects to Learn New Languages and New Techshttps://blchrd.eu/2023/12/19/rewrite-project-to-learn/2023-12-19T16:19:57.000Z2023-12-19T23:22:28.609ZIn the developer field - and by extension, in tech field - continuously learning new stuff, keeping yourself sharp at what you do and just keeping yourself updated is highly recommended, if not just required.
In my morning routine - no, I’ll not talk about sport here -, the first thing I do is making coffee, and then scroll at my RSS feeds. Most of the stuff are just news about the world, gaming and music. But in them, there also are a lot of tech news and dev blog post - and yes, HackerNews too. While reading it, I can deduct the current “à la mode” techs and languages. I almost always take the “Getting started” of a tech I didn’t know, write an Hello world and / or a todo-list, and then decide if I want to dig further or not.
While chatting with a fellow developer - maybe he’ll recognize himself -, we start talking about the fact I want to learn Golang. Some languages are more appealing to me, and Golang is one of them. I already did the “Getting started” and some tutorials, but what I lacked to really start learning, is a project idea.
When I want to learn a language, I want to have at least a small project idea, to write a piece of software I find useful, or at least fun to write. The todo-list is always my first stop, but after that, I want to make more.
The discussion going, I had an idea: maybe I can rewrite the PlaylistShare backend in Golang, to learn it? There is no real downside in rewriting a project. You’ll learn the language, you already have documentation about what kind of feature you’ll write (well, if you document your project correctly), and some constraints - like, do not break the frontend. At the end, ok I’ll have two backend, but I’ll have more knowledge about the behavior of the language and the syntax of it, I can even have some new ideas about the backend itself, or even a new project ieea..
And I started it, rewriting my PHP/Laravel backend in Golang. I have a kind-of working version right now, and I understand a little better some specifics of the language. It’s not magical though, I can’t say I’m productive with Go, but I understand some stuff, and reading Go code is much easier right now.
This kind of rewriting has been a revelation, and I recommend to all the people who wants to learn another language to test it, if you didn’t have an existing project to do it, well, start to make a project then. I know that’ll not work for everyone, but for me, it works quite well.
Right now, I try to learn Rust with a similar process, rewriting my HNWGen project (originally written in Java).
]]><p>In the developer field - and by extension, in tech field - continuously learning new stuff, keeping yourself sharp at what you do and jusAbout Note Takinghttps://blchrd.eu/2023/09/10/about-note-taking/2023-09-10T17:04:17.000Z2023-09-10T23:05:40.091ZIntroduction (kind of)
I take a lot of notes in various formats and on different devices, so it can be a bit complex to retrieve a note I wrote some time ago.
I used CherryTree a lot when I was in France, and it covered most of my needs. But after moving to Canada, I started to take notes on my phone and also began using the terminal frequently. Consequently, CherryTree was no longer as useful, or at least not the best tool for my current needs.
I should know how to list my needs because it is part of my job, and find or even create the software that covers all or most of those needs.
So I start doing it, and it was quite a journey.
Why, when and how?
First, I need to take a step back in my note-taking process to understand why, when, and how I take notes.
Why? To avoid forgetting something, obviously. Sometimes it is just to help my memory (it helps me remember something, even if I don’t reread it later). It can help me organize and prioritize tasks. Or it’s just to throw distracting ideas out of my brain to focus on what I’m doing right now. I don’t really have to remember or even retrieve the last one; it’s really about removing distractions.
When? This one is easy: at any time, day or night.
How? Well, here is the tricky question. It is chaotic. I use a lot of support and different devices (pen and paper, Android phone, both Windows and Linux PCs). I don’t organize it very well. It can be on a post-it with only a word or two, or it can be a markdown file hidden on my hard drive with a long reflection about a topic or an idea I’m trying to elaborate on. It can also be a full notebook on a specific software, like my CherryTree notebook.
The format of one note is almost always the same: a list of items. It is rare that I note a full paragraph, or it’s a full webpage backup. Yes, I sometimes download a webpage to read it offline, or even just for backup purposes.
I’m leaving the “where” question aside because I don’t find it relevant here; the answer is pretty much the same as “when”: everywhere.
Try to define my needs
Until now, I have been using CherryTree for taking my notes and syncing them with Dropbox. It has worked quite well up to this point. However, I now have a significant number of notes on my phone, and there isn’t an Android version of CherryTree available. So, I’m faced with two options: either I develop an Android version myself or I change my workflow. Both options are time-consuming, but I’ve decided to go with the second one.
I need to narrow down my requirements in order to choose the right piece of software:
I love taking notes on paper, I just need a pen and a physical notebook, not sure this point is relevant.
I prefer Markdown syntax or a similar format because I find it more convenient. It will likely be easier to write a conversion script for my CherryTree notebooks.
I require synchronization between multiple devices and operating systems (Android, Windows, Linux, etc.), I can consider manual synchronization.
I need a tag system, even though I haven’t used tags extensively in the past. I recognize the importance of using such a system to facilitate easy searching within my notes.
I would like the software to have a command-line interface (CLI) application for adding, editing, and removing notes on both Windows and Linux.
I have one more constraint: I do not want to use a centralized note service like Evernote or Obsidian synchronization. I want the flexibility to store my notes wherever I choose and to move them to a different location if needed.
Softwares and current workflow
I read about nb while browsing the geminispace, and it interested me immediately. It is a CLI / TUI notetaking app with many really cool features: bookmarks (with a local copy for offline reading), to-do list, tags, git synchronization, and more. Plus, it stores notes as simple markdown files on the hard drive, making it easy to synchronize other files and add them.
As for Android, I tried various applications. First, I explored some on the Play Store, but then I started developing my own. I’ve been using it for 4 or 5 months now. I was already familiar with Markor, but I didn’t fully utilize it until I embarked on a three-month journey in North America.
During my travels, I began taking extensive notes on my phone, and Markor proved to be a straightforward application: one file for one note. It also includes a to-do list feature, although I didn’t make much use of it, it’s worth mentioning.
Lastly, there’s Syncthing. This application stands out as one of the best discoveries I’ve made this year. It allows you to seamlessly synchronize content between your smartphone and your PC. It offers a plethora of settings when configuring the sync, and most importantly, it works exceptionally well and is easy to use.
All of these elements have converged into the workflow I’ve been experimenting with:
nb: for PCs, both on Linux and Windows (with WSL for the latter, so it’s essentially still Linux).
Markor + Syncthing: for my Android phone.
I’m considering writing some automation scripts for syncing, even though it’s quite usable without them. I know it will be fun to create these scripts.
Here are some issues:
Syncing with Android and Windows: Currently, I use nb with WSL, and I use rsync in addition to Syncthing when I really need to synchronize notes directly between Android and Windows.
Viewing notes on Android: I can read my notes on git directly with Android, but searching isn’t really an option.
A couple of thoughts on Pen & Paper synchronization, just for fun:
Take pictures of the notebook page and synchronize the photo with Syncthing/nb.
Try to OCR the notebook page. I also gave it a try, but it didn’t work well. However, I didn’t really get into the technology.
Conclusion (kind of)
I have been using this workflow for about a month now, and it has been working well so far. I highly recommend giving ‘nb’ a try if you’re not afraid of the terminal.
It is just my train of thought on my note-taking system. I wanted to share this here, and if someone discovers one of the software I talk about here, I consider this post useful.
I still refer to my CherryTree notebook from time to time while working on the conversion script; for now, my notes are stuck in there. I’ve started working on a script for my personal use — it’s advanced enough to share the code, but it’s far for completed — and I’ll build upon it to create a full conversion script.
I’ve come to realize that I enjoy writing conversion scripts. It’s not too complex, and it helps me become more comfortable with different formats and languages. I love these kinds of “coffee break” scripts and projects.
Take care, everyone!
]]><h2 id="Introduction-kind-of"><a href="#Introduction-kind-of" class="headerlink" title="Introduction (kind of)"></a>Introduction (kind of)</A Story About Docker Volume Misconfigurationhttps://blchrd.eu/2023/08/23/a-story-about-docker-volume-misconfiguration/2023-08-23T11:59:49.000Z2023-08-23T18:02:16.618ZStumbled upon the issue
I updated PlaylistShare on this server recently, and I encountered an issue. The backend resulted in error 500 when retrieving the albums. The last update worked well, so I didn’t initially investigate that angle. I was wrong, but we’ll get to this later.
It runs well on my local server, and I haven’t encountered this issue in all my tests, so I didn’t think it’s in my code. I checked it, of course, and I didn’t see anything weird.
I started to check if the Docker Compose works well. I reviewed the build log, but didn’t find anything relevant at first glance. In reality, there was something, but I overlooked it.
Next, I checked the Docker output using the command docker attach <container_name> and I received the complete error message, which informed me that one of my new tables has an error.
I execute a shell within the Docker container using the command docker exec -it <container_name> sh, and then proceed to investigate what might be wrong.
After performing some initial checks (such as confirming the proper application of the update), I examined the database directory and the migrations directory. It was at that point that I realized my mistake.
Explanation: my docker-compose configuration was incorrect
What I didn’t notice in the Docker build log is that the final database migrations I had written didn’t execute.
When I configure my Docker setup for PlaylistShare, I include the entire app/database as a volume.
Seems like a good idea. The database.sqlite file is in this directory by default. All my recent updates have worked well because I haven’t altered the database schema; they were mostly frontend updates.
But when I updated the database schema… Well, the migration files were not taken into account because they are located in the directory /app/database/migrations, which is part of the volume app/database. Therefore, this directory is not updated with the containers. My migration files don’t get into the container, and the non-updated database triggers the 500 error that I am encountering.
Temporary solution
I want to quickly address this in production, so I simply copy/paste the migration from Git to the Docker volume in the same shell as above, and then manually initiate the migration.
This does the trick, but it’s a short-term solution. I don’t intend to manually update my database with each migration; it should be an automated process.
Definitive solution
To definitively fix the problem, I have a list of tasks that I must complete:
Change the database path: without a volume, any updates will erase the database. Therefore, I can no longer use the default folder.
Update the volume configuration to eliminate the use of app/database.
Ensure that the production database remains unaffected during the update process to prevent any loss of data.
The first point and the second point are the easiest. Add an environment variable in the backend Dockerfile for the first one:
The volumes section is used for naming the volume. I hadn’t named my volume until now, so the volume’s name was excessively long and didn’t convey any meaning. It’s quite frustrating when you need to work with such a volume.
For the third and final point, it’s a bit more complex. I can’t achieve it by simply altering a few configuration files.
After reading some posts on StackOverflow, the Docker documentation and asking ChatGPT (ok, I didn’t really ask ChatGPT), I’ve identified two distinct approaches to address this problem:
Manually copy the contents of the volume directly to the system file. Volumes are located at /var/lib/docker/volumes/ on Debian (likely the same for other Linux OS, but I haven’t verified this).
Backup and restore the volume using Docker (refer to the documentation)
I chose the first option for various reasons, with the main one being that this solution is simpler and quicker. Additionally, I only need to perform this task once.
As for the second option, I will examine it. This is because I intend for that instance to become public at some point in the future. To achieve this, an automatic database reset is necessary, although that is a separate topic.
Finally, we need to perform the migration manually, utilizing a Docker shell:
1
2
3
docker exec -it <container_name> sh php artisan migrate exit
And that’s it! It works for me. It was a quick and dirty solution, but as I mentioned earlier, it’s a one-time-only operation.
You should perform some cleanup on the volume. I removed the older volume using the following commands:
1 2
docker volume ls docker volume rm volume_name
Conclusion
Not much to say, I just want to share my debugging process here; it is quite straightforward.
Perhaps some individuals will learn something by reading this—maybe someone made the same mistake as me and can see how they might rectify it. In any case, I hope this post will prove useful, or at the very least, interesting.
Take care, folks.
]]><h2 id="Stumbled-upon-the-issue"><a href="#Stumbled-upon-the-issue" class="headerlink" title="Stumbled upon the issue"></a>Stumbled upon theCreate Confirmation Dialog Component With ReactJShttps://blchrd.eu/2023/08/14/create-confirmation-dialog-component-with-reactjs/2023-08-14T09:22:13.000Z2023-08-15T05:38:36.236ZWhy a confirmation dialog?
If there is one component you will always need, whatever your application is about, it is a confirmation dialog. They are ubiquitous; whether you want to delete an entry, gather consent, or simply alert the user that a process will take some time.
In this post, I will walk through the design and development of my version of a confirmation dialog component.
It is not the only one; there are many tutorials out there covering the same subject, and you might even have a different vision of what constitutes a good confirmation dialog.
What is a confirmation dialog?
That seems like a trivial question, but the answer is crucial for designing the component properly.
A confirmation dialog is a window shown to the user when we need their confirmation to proceed with the current action. The action itself is not really relevant and can be anything. The classic use-case is deleting a record in the database.
With that definition, we can outline the main features of a confirmation dialog:
Display information about what the user needs to confirm.
A confirm button with a callback function to execute the confirmed action.
A cancel button that closes the dialog.
We all know how it looks, but saying — or showing in this case — the obvious is sometimes a good thing:
What the component’s code looks like
Create a new file named ConfirmDialog.js.
For this component, I am using Material-UI for all the styling. However, you can use whatever you prefer; the code will not change significantly.
I will provide the code here and explain it afterward.
exportdefaultfunctionConfirmDialog({ title, content, onConfirm, openState, setOpenState, cancelButtonText = "No", confirmButtonText = "Yes", onCancel = null }) { // Execute the cancel callback code and close the dialog consthandleClose = () => { if (onCancel !== null && onCancel !== undefined) { onCancel(); } setOpenState(false); };
// Execute the confirmation callback code and close the dialog consthandleConfirm = () => { onConfirm(); setOpenState(false); }; return ( <div> {/* Dialog component for displaying confirmation dialog */} <Dialog open={openState} onClose={handleClose} aria-labelledby="alert-dialog-title" aria-describedby="alert-dialog-description" > <DialogTitleid="alert-dialog-title"> {title} </DialogTitle> <DialogContent> <DialogContentTextid="alert-dialog-description"> {content} </DialogContentText> </DialogContent> <DialogActions> {/* Cancel button to dismiss the dialog */} <ButtononClick={handleClose}autoFocus>{cancelButtonText}</Button> {/* Confirm button to execute the confirmed action */} <Buttonid="dialog-confirm-button"onClick={handleConfirm}>{confirmButtonText}</Button> </DialogActions> </Dialog> </div> ) }
As you can see, most of the component’s behavior is managed by the caller rather than the component itself. This might seem evident upon consideration, but as mentioned earlier, stating the obvious can still be beneficial.
While I could delve into explaining all the props here, some are relatively self-explanatory. You probably already understand the purposes of title, content, cancelButtonText, and confirmButtonText.
Here’s a brief rundown of the other props:
onConfirm: This prop is a callback function triggered when the confirmation button is clicked.
openState / setOpenState: These props consist of the open state and the corresponding state-setting function from the caller component. They are used to control the visibility of the confirmation dialog, either opening it or closing it.
onCancel: By default set to null, this prop offers a callback function for the cancel button click. It accommodates scenarios where more than just closing the dialog is necessary, covering those specific requirements.
Implementation
Here’s an example illustrating the usage of the component:
Now you can test it out and determine if this approach suits your needs.
Conclusion (kind of)
That is a straightforward component, and there are opportunities for enhancements. For instance, currently, pressing the ‘Escape’ key on your keyboard will close the confirmation dialog, but pressing ‘Enter’ doesn’t have any effect.
Furthermore, the UI/UX could be enhanced further. You have the option to incorporate animations or customize the CSS for a more polished appearance.
If you’ve read through this entire post, I appreciate your attention, and I hope you found this information valuable.
]]><h2 id="Why-a-confirmation-dialog"><a href="#Why-a-confirmation-dialog" class="headerlink" title="Why a confirmation dialog?"></a>Why a confSetting Up a Gemini Capsulehttps://blchrd.eu/2023/08/02/setting-up-a-gemini-capsule/2023-08-02T16:42:05.000Z2023-08-15T05:38:36.236ZSometimes, while reading news in my RSS feeds, I stumble upon an article that awakens in me an irresistible desire to get my hands dirty and start working on something I previously didn’t know, to see where that leads me.
Recently, I read an article about the Gemini Protocol, and I decided to dive in and create a Gemini capsule on my own.
What is Gemini?
Gemini is an internet protocol designed in 2019, offering a contemporary twist on the early days of the online world. It represents a simplified alternative to other modern web protocols, omitting trackers, scripting, and elaborate styling in favor of an easily parsed markup language.
Moreover, Gemini prioritizes security through built-in encryption and emphasizes privacy, again, no trackers involved.
I view Gemini as a cool spot where I enjoy interacting with friendly folks and simply relaxing.
However, it is not intended to replace the web as we know it, I quote the FAQ on the official web site
Gemini is not intended to replace either Gopher or the web, but to co-exist peacefully alongside them as one more option which people can freely choose to use if it suits them
The full specification of the protocol isn’t quite as extensive. I mean, the FAQ I mentioned earlier is actually longer than this specification! I gave it a quick read, but at this point, I don’t feel quite up to implementing it from scratch. It would be a really cool project though.
I’ll leave you to explore the official website yourself if you’re interested; there are numerous resources available there.
So, let’s make a capsule?
A “capsule” is the term used in Gemini to refer to a “Gemini Website,” or more precisely, a “Gemini set of pages.”
Firstly, we need to familiarize ourselves with the “gemtext” markup language, which bears some resemblance to Markdown, although there are notable differences. For instance, in a gemtext file, you cannot create an inline link as you would in Markdown; instead, you must write a new line containing only the link itself.
For my capsule, I decide to write a Python script to transform the MarkDown source file of Hexo into .gmi file for Gemini.
I use the md2gemini library to handle a significant portion of the task, and some classic string manipulations for the specific file format of Hexo, such as header information.
defcreate_index_page(blog_post_list): print(f"Create index links list in {root_gmi}/index.gmi") blog_post_links = "" for blog_post in blog_post_list: blog_post_links += f"=> {blog_post_list}"
gemini_index = blog_post_links withopen(f"{root_gmi}/index.gmi",'w') as wf: wf.write(gemini_index)
Path(root_gmi).mkdir(parents=True, exist_ok=True) transform_markdown_into_gemtext('source/about/index.md', 'about.gmi', blog_post=False) for root, dirs, files in os.walk('source/_posts'): for file in files: transform_markdown_into_gemtext(f'{root}/{file}', file.replace('.md', '.gmi'))
This is a stripped-down version of it. The full script I use is on this repository. Now we have all our gmi files, ready to be serve.
Files ok, now the server
There are numerous server software options available for Gemini, developed in various programming languages—I’m not sure if I mentioned this, but it could be a really fun project. So, you have a variety of choices. Among these, I personally opted for the one I had heard about the most, Agate (written in Rust). Once you’ve downloaded the binary, a straightforward command in the terminal and you’re all set.
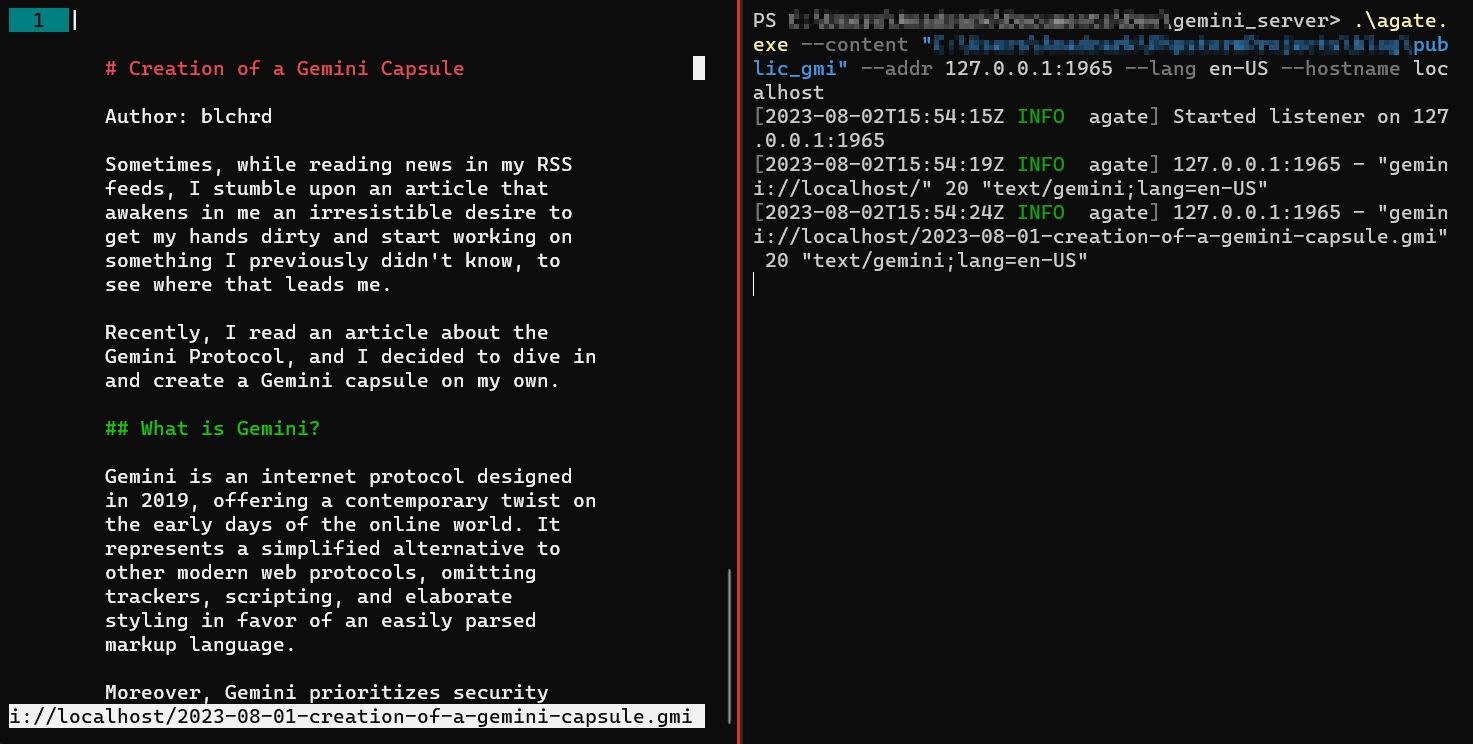
And voilà, your server is up and running locally. All that’s required at this point is a Gemini client to test whether everything is displaying correctly.
I never really browse the geminispace before starting to play with it. So, I went to the software page of Gemini’s website, and look at all the client, same as the server, a lot of it, in a diverse language and… ok, I put in my project idea to develop client and maybe server software for Gemini, that look so cool.
In the end, I go for Amfora, a terminal client for Gemini, who work like a charm.
And finally, I can test it, and it looks good (the Gemini client is on the left terminal, and on the right is the server):
Let’s go serve this to the world
I began by installing Agate on my server, and then attempted to serve it using the same command line as before:
That didn’t work; it displayed ‘Permission denied’ for certificate creation. It attempted to create in the default directory. I attempted the magical word ‘sudo’, but then it responded with ‘agate: command not found’.
So, I forced the certificate path to one with the appropriate permissions:
And it’s working! You can now access my gemlog (the term for “blog” in the geminispace) entries using the Gemini protocol at the address gemini://blchrd.eu.
Conclusion
I won’t deny it, the most enjoyable aspect was undoubtedly writing the script. It also constituted a significant part of the process, as I utilized established Gemini server and client tools for this endeavor.
However, I take pleasure in delving into the technical details, and I might eventually write my own Gemini client and server. I’ve been exploring the code of various implementations, including the ones I’ve been using, and I’m keen to dive into this further.
]]><p>Sometimes, while reading news in my RSS feeds, I stumble upon an article that awakens in me an irresistible desire to get my hands dirty Production for ReactJS Frontend and PHP/Laravel Backendhttps://blchrd.eu/2023/07/31/docker-with-reactjs-and-laravel/2023-07-31T16:11:18.000Z2024-01-17T00:46:36.201ZDisclaimer
This is not a tutorial of any kind.
I don’t really describe what Docker, Laravel, or ReactJS are, nor do I explain all the configuration files below.
There are many people who write much better than me and have already explained all of this. Your favorite search engine will direct you to them.
I just want to share with you what I’ve learned while trying to put this project into production and the difficulties I’ve encountered along the way.
So, that said, we can start.
The project: Playlist Share
I have been working on a long-term project to share all the music I listen to and organize it on my own server.
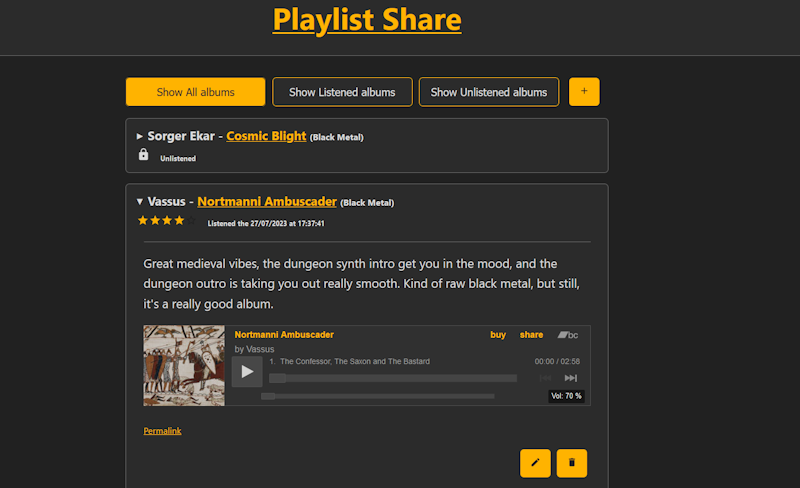
Initially, I used Twitter extensively, and later switched to Mastodon. While these platforms are quite usable for day-to-day sharing, retrieving all my listening data for a month or even a year becomes more complicated. It’s possible, but not an easy task. That’s why I decided to develop this application.
Currently, the application looks like this (if you’re into the same music as me, you can search for the two albums in the screenshot - they’re great!):
The stack choice
It’s been a while since I wanted to give ReactJS a try, so choosing the frontend technology wasn’t too hard.
On the other hand, I hesitated a little with the backend. Initially, I wanted to use PHP, so I started with the Symfony framework, which I was already familiar with. However, I also wanted to step out of my comfort zone. So, in the middle of the project, I made the decision to switch the framework and started using Laravel.
I didn’t regret it at all; I found Laravel to be a lot more intuitive for API development. However, this is a personal preference, as I know some people might argue that Symfony is better. It’s worth noting that Laravel is heavily based on Symfony, so they do have some similarities.
As for the database, I didn’t need a really large database for now, so I went with my usual choice: SQLite. I don’t have too many arguments here, I just love this database since I first used it a long time ago.
Learning Docker
First steps, first mistakes, what a mess
I didn’t know Docker well, but just like ReactJS, I wanted to give it a try. So, here we are, learning Docker and Dockerfile syntax and starting to test it out.
At first, I created a rather messy Docker repository with a lot of git clone commands directly in Dockerfile. In my head, it wasn’t the best approach, but hey! Learning, right?
My main issue was the fact that I had two repositories, one for the frontend and one for the backend. I guess that having only one repository would probably make the Docker configuration a lot easier (though I wasn’t entirely sure, just assuming).
Since I didn’t want to merge the two repositories, my initial thought was to create a third repository containing all the Docker configuration and pull all the code I need with git directly in the Dockerfile. However, I wasn’t sure if it’s considered a good practice with Docker. Therefore, I decided to search another way to accomplish my goal.
Interlude, learning about git submodule
Then, when I was seeking a more elegant solution to my issue, I discovered git submodules.
1
git submodule add <repo_url> <target_dir>
It was the solution for all my multi-repo issues. It kind of creates a symbolic link between one git repo and another, allowing you to have multiple repositories for code tracking but only one when it comes to deployment.
Using git submodules allowed me to create the Dockerfile in frontend and backend repositories without having to deal with messy Dockerfiles as shown above.
The only side-effect is that I have two more command lines to remember:
# Environment variables for admin user ENV ADMIN_NAME=test ENV ADMIN_EMAIL=test@test.fr ENV ADMIN_PASSWORD="12345678"
RUN composer install RUN php artisan migrate --force RUN php artisan key:generate # caching stuff for production RUN php artisan cache:clear RUN php artisan config:cache RUN php artisan route:cache RUN php artisan view:cache
Don’t forget to include RUN php artisan key:generate in your Laravel Dockerfile. If you skip this step, your backend will return a 500 error consistently.
Additionally, I use the --force argument in php artisan migrate to create the database if it doesn’t exist (since I’m using SQLite database).
Production time
To put it into production, I am first thinking of including the web server directly in the docker-compose.yml file. It is good for some cases, especially when you have only one server with this application, but for my usage, it’s not really ideal. I talked about it in my last post.
I keep the nginx service in the docker-compose.yml file, but I will simply comment out the line related to it. The current configuration file looks like this:
For the ports line, it is allowed for localhost to access the port in question, but it cannot be accessed from outside. So, it’s a win-win situation in my case.
Here is the nginx configuration file in case the nginx server is included directly in Docker:
1 2 3 4 5 6 7 8 9 10 11 12 13 14 15 16
events {} http { server { listen80; server_name localhost:80;
In the nginx proxy config in Docker, you need to use the container name in the URL (e.g., http://backend:8000) instead of using localhost. If you mistakenly use localhost, you’ll encounter a nice 502 Bad Gateway error, and it can be quite frustrating if you’re not aware of this - like I was - and you might get stuck for hours trying to figure out the issue.
After going through all of this (which took me several days to figure out), the final command line, and everything works together smoothly (at least for me), is:
1
docker-compose up --build
And that’s it.
To update the container, for now, I use:
1
docker-compose up --force-recreate --build -d
I’m not sure if there’s a better way, but currently, it is sufficient for my needs.
Conclusion (kind of)
It was a cool journey to get here, but that’s just the beginning of it. I still have to learn about CI/CD pipelines, cloud computing, and all the other fascinating and time-consuming tech topics. Development is a non-stop learning process, and that’s why I love developing stuff so much.
There is one online instance with some data in it - it is my personal instance, my development instance, my test instance, and… well, you get it. You can’t test it for now, I’m sorry for that, but I will continue to work on it and eventually get one public instance for you to test.
So, keep developing stuff, sharing knowledge, and, above all else, take care of yourself.
]]><h2 id="Disclaimer"><a href="#Disclaimer" class="headerlink" title="Disclaimer"></a>Disclaimer</h2><p><strong>This is not a tutorial</strongMigration From Apache to Nginxhttps://blchrd.eu/2023/07/28/migration-from-apache-to-nginx/2023-07-28T14:11:12.000Z2023-08-14T16:34:59.947ZSome context about why I replace Apache
While I was working on the production environment for PlaylistShare, I encountered some problems, or at least some questions I have to answer before proceeding.
One of these questions is: what web server will I use? I want to dockerize the application, so my first thought was to include the web server directly into the docker-compose.yml. But this article made me think a little further, and finally, I decided to install the web server outside of Docker.
I migrated from Apache to nginx for a lot of reasons, but mainly because I want to use the proxy features for running this website and dockerized application, and it is way simpler with nginx than Apache. The configuration is a lot less verbose, and it is very human-readable.
That’s all for the context; I will write a blog post about the process of putting my app into production. But here, we are talking about Apache / nginx migration.
One last piece of information, though: my server runs on Debian/Linux.
First, install nginx
This is the more straightforward step: just install nginx. The service will not start because Apache is still running on port 80.
1
2
apt-get update apt-get install nginx
If you want to use php - and I think you will eventually - you have to install php-fpm
1
apt-get install php-fpm
Next, we change the port in the default config file /etc/nginx/sites-available/default to test if nginx works properly.
Just replace this line
1 2 3 4 5
server { ... listen *:80 ... }
by
1 2 3 4 5
server { ... listen *:8000 ... }
Then start the service with
1
service nginx start
Navigate to your server, and check if it returns what it should.
Once that’s done, stop the service for now.
1
service nginx stop
Then, transform configuration file
Second step, we need to convert Apache’s configuration file to nginx’s ones.
It’s the step with the most pitfalls because the conf files are not the same at all. In Apache, we configure Virtual Hosts; in nginx, it’s “server.”
Here’s what my Apache configuration looks like (I fused the two vhosts for convenience):
Include /path/to/ssl.conf SSLCertificateFile /path/to/cert/example.com/cert.pem SSLCertificateKeyFile /path/to/cert/example.com/key.pem
<Location /> Orderdeny,allow Allow from all </Location> </VirtualHost> </IfModule>
One thing we’ll see very fast is that the nginx conf file is not as verbose - I’m sure it can be, but for my usage, it is not.
For the first vhost with port 80, it just redirects to the https version of the website, so the configuration for nginx is really simple:
1 2 3 4 5
server { listen80; server_name example.com www.example.com; return301 https://$server_name$request_uri; }
In my opinion, that was when I knew I would love nginx, and I didn’t even scratch the surface yet.
Be careful not to forget the semi-colon at the end of each line. I forgot it, and nothing worked. But the error message is pretty clear, so I didn’t get stuck for very long.
For the SSL part, the configuration file is a little bigger:
root /path/to/website; location / { index index.html index.php; } location~ \.php$ { include snippets/fastcgi-php.conf; fastcgi_pass unix:/run/php/php7.4-fpm.sock; } }
Don’t forget the last part, location ~ \.php$. It’s the one that serves PHP files properly. If you forget it, your web server will return the PHP file (so yes, it will return your source code).
All the configuration files is created in /etc/nginx/sites-available/ directory. Once the file is created, you need to make a symlinks on the /etc/ningx/sites-enabled/ directory, you can do this with this command:
Once all the configuration files were written, one thing left on the list: stop Apache and start nginx.
For this, two command lines:
1
2
service apache2 stop service nginx start
After that, if you have no errors, you can browse your way out to your website and check if it works like before. It was the case for me.
Conclusion (kind of)
This migration was really fun to make.
The configuration behavior can differ between Apache and nginx, but right now, I didn’t find any difference. Feel free to contact me if something is wrong here.
I hope this can help you if you want to make the same migration I’ve done. It is not really a tutorial, at most it’s a to-do list if I want to migrate another server.
Take care, folks.
]]><h2 id="Some-context-about-why-I-replace-Apache"><a href="#Some-context-about-why-I-replace-Apache" class="headerlink" title="Some context aFrom Vanilla PHP to Hexohttps://blchrd.eu/2023/07/27/from-vanilla-php-to-hexo/2023-07-27T10:10:32.000Z2023-08-14T16:34:59.947ZI have had this website for less than a year, and I’ve been wondering what to do with it.
Until now, it has been just a small dynamic website where I put my work in progress and my most advanced projects, along with a little description of myself. I used a single PHP page that retrieves data from a bunch of .json files. Not gonna lie, I love developing this little thing.
But in the end, it wasn’t enough. I want to do more with this website.
So I searched for a blog engine, and I have some requirements:
Not a big blog engine; WordPress and others are not for me. I just want to share text and links, and using them would be overkill.
I want to write blog posts and pages with Markdown, which is much easier than direct HTML editing or a WYSIWYG editor, at least for me.
I want it to be easy to install and maintain, for obvious reasons.
If it can generate a static website, that’s even better, but it’s not a strict requirement; I can do without this function.
After looking at some engines - like Jekyll and Dropplets, the two main contenders - I decided to give Hexo a try. On paper, it checks all my points, and it has a lot of really cool templates too - I ended up using the Cactus theme here.
The installation is straightforward, five command lines in a terminal, and you’re good to go.
1 2 3 4 5
npm install hexo-cli -g
hexo init blog
cd blog
npm install
hexo serve
Your blog is now running on localhost:4000, and a ‘Hello World’ page welcomes you, with all the instructions you need to create posts, generate the static files, and so on.
The configuration file is about a hundred lines, and the main items are easy to configure without the documentation (I wonder what title, in the Site section, will do…), but for the rest, the documentation is really clear.
There is additional configuration for the theme you chose, even if you want to keep the original one.
After generating some test blog posts and testing some themes, I finally decided to go with Hexo and the cactus theme for my personal website. It checks all the requirements I had, and it is easy to understand, set up, configure, and maintain.
If you are wondering about which blog engine you want, and your requirements look like mine, I recommend you to give Hexo a try.
]]><p>I have had this website for less than a year, and I’ve been wondering what to do with it.</p>
<p>Until now, it has been just a small dyna